登录添加验证码是一个非常常见的需求,网上也有非常成熟的解决方案,其实,要是自己自定义登录实现这个并不难,但是如果需要在 Spring Security 框架中实现这个功能,还得稍费一点功夫,本文就和小伙伴来分享下在 Spring Security 框架中如何添加验证码。
关于 Spring Security 基本配置,这里就不再多说,小伙伴有不懂的可以参考 http://springboot.javaboy.org/,本文主要来看如何加入验证码功能。
准备验证码
要有验证码,首先得先准备好验证码,本文采用 Java 自画的验证码,代码如下:
1
2
3
4
5
6
7
8
9
10
11
12
13
14
15
16
17
18
19
20
21
22
23
24
25
26
27
28
29
30
31
32
33
34
35
36
37
38
39
40
41
42
43
44
45
46
47
48
49
50
51
52
53
54
55
56
57
58
59
60
61
62
63
64
65
66
67
68
69
70
71
72
73
74
75
76
77
78
79
80
81
82
83
84
85
86
87
88
89
90
91
92
93
94
95
96
97
98
99
100
101
102
103
|
public class VerifyCode {
private int width = 100;
private int height = 50;
private String[] fontNames = { "宋体", "楷体", "隶书", "微软雅黑" };
private Color bgColor = new Color(255, 255, 255);
private Random random = new Random();
private String codes = "0123456789abcdefghijklmnopqrstuvwxyzABCDEFGHIJKLMNOPQRSTUVWXYZ";
private String text;
private Color randomColor() {
int red = random.nextInt(150);
int green = random.nextInt(150);
int blue = random.nextInt(150);
return new Color(red, green, blue);
}
private Font randomFont() {
String name = fontNames[random.nextInt(fontNames.length)];
int style = random.nextInt(4);
int size = random.nextInt(5) + 24;
return new Font(name, style, size);
}
private char randomChar() {
return codes.charAt(random.nextInt(codes.length()));
}
private BufferedImage createImage() {
BufferedImage image = new BufferedImage(width, height, BufferedImage.TYPE_INT_RGB);
Graphics2D g2 = (Graphics2D) image.getGraphics();
g2.setColor(bgColor);
g2.fillRect(0, 0, width, height);
return image;
}
public BufferedImage getImage() {
BufferedImage image = createImage();
Graphics2D g2 = (Graphics2D) image.getGraphics();
StringBuffer sb = new StringBuffer();
for (int i = 0; i < 4; i++) {
String s = randomChar() + "";
sb.append(s);
g2.setColor(randomColor());
g2.setFont(randomFont());
float x = i * width * 1.0f / 4;
g2.drawString(s, x, height - 15);
}
this.text = sb.toString();
drawLine(image);
return image;
}
private void drawLine(BufferedImage image) {
Graphics2D g2 = (Graphics2D) image.getGraphics();
int num = 5;
for (int i = 0; i < num; i++) {
int x1 = random.nextInt(width);
int y1 = random.nextInt(height);
int x2 = random.nextInt(width);
int y2 = random.nextInt(height);
g2.setColor(randomColor());
g2.setStroke(new BasicStroke(1.5f));
g2.drawLine(x1, y1, x2, y2);
}
}
public String getText() {
return text;
}
public static void output(BufferedImage image, OutputStream out) throws IOException {
ImageIO.write(image, "JPEG", out);
}
}
|
这个工具类很常见,网上也有很多,就是画一个简单的验证码,通过流将验证码写到前端页面,提供验证码的 Controller 如下:
1
2
3
4
5
6
7
8
9
10
11
12
| @RestController
public class VerifyCodeController {
@GetMapping("/vercode")
public void code(HttpServletRequest req, HttpServletResponse resp) throws IOException {
VerifyCode vc = new VerifyCode();
BufferedImage image = vc.getImage();
String text = vc.getText();
HttpSession session = req.getSession();
session.setAttribute("index_code", text);
VerifyCode.output(image, resp.getOutputStream());
}
}
|
这里创建了一个 VerifyCode 对象,将生成的验证码字符保存到 session 中,然后通过流将图片写到前端,img 标签如下:
1
| <img src="/vercode" alt="">
|
展示效果如下:

自定义过滤器
在登陆页展示验证码这个就不需要我多说了,接下来我们来看看如何自定义验证码处理器:
1
2
3
4
5
6
7
8
9
10
11
12
13
14
15
16
17
18
19
20
21
22
| @Component
public class VerifyCodeFilter extends GenericFilterBean {
private String defaultFilterProcessUrl = "/doLogin";
@Override
public void doFilter(ServletRequest req, ServletResponse res, FilterChain chain)
throws IOException, ServletException {
HttpServletRequest request = (HttpServletRequest) req;
HttpServletResponse response = (HttpServletResponse) res;
if ("POST".equalsIgnoreCase(request.getMethod()) && defaultFilterProcessUrl.equals(request.getServletPath())) {
String requestCaptcha = request.getParameter("code");
String genCaptcha = (String) request.getSession().getAttribute("index_code");
if (StringUtils.isEmpty(requestCaptcha))
throw new AuthenticationServiceException("验证码不能为空!");
if (!genCaptcha.toLowerCase().equals(requestCaptcha.toLowerCase())) {
throw new AuthenticationServiceException("验证码错误!");
}
}
chain.doFilter(request, response);
}
}
|
自定义过滤器继承自 GenericFilterBean,并实现其中的 doFilter 方法,在 doFilter 方法中,当请求方法是 POST,并且请求地址是 /doLogin 时,获取参数中的 code 字段值,该字段保存了用户从前端页面传来的验证码,然后获取 session 中保存的验证码,如果用户没有传来验证码,则抛出验证码不能为空异常,如果用户传入了验证码,则判断验证码是否正确,如果不正确则抛出异常,否则执行 chain.doFilter(request, response); 使请求继续向下走。
配置
最后在 Spring Security 的配置中,配置过滤器,如下:
1
2
3
4
5
6
7
8
9
10
11
12
13
14
15
16
17
18
19
| @Configuration
public class SecurityConfig extends WebSecurityConfigurerAdapter {
@Autowired
VerifyCodeFilter verifyCodeFilter;
...
...
@Override
protected void configure(HttpSecurity http) throws Exception {
http.addFilterBefore(verifyCodeFilter, UsernamePasswordAuthenticationFilter.class);
http.authorizeRequests()
.antMatchers("/admin/**").hasRole("admin")
...
...
.permitAll()
.and()
.csrf().disable();
}
}
|
这里只贴出了部分核心代码,即 http.addFilterBefore(verifyCodeFilter, UsernamePasswordAuthenticationFilter.class); ,如此之后,整个配置就算完成了。
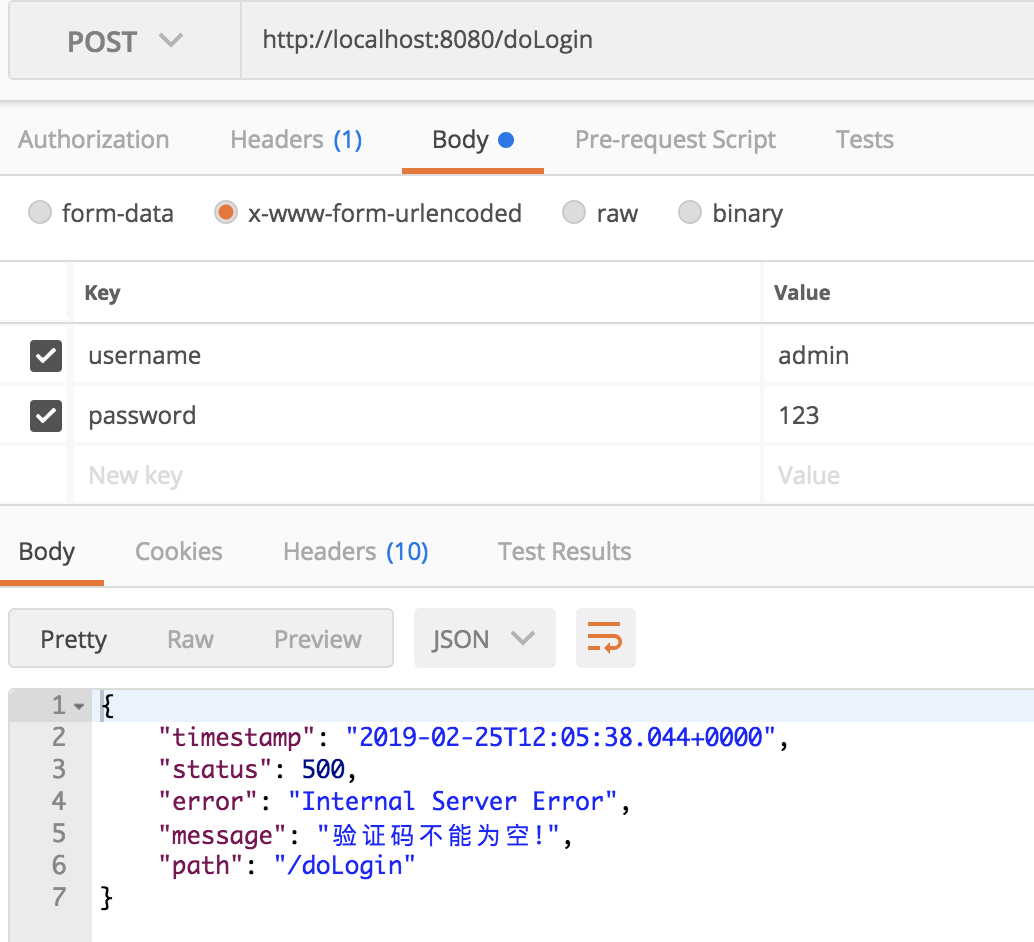
接下来在登录中,就需要传入验证码了,如果不传或者传错,都会抛出异常,例如不传的话,抛出如下异常:

本文案例,我已经上传到 GitHub ,欢迎大家 star:https://github.com/lenve/javaboy-code-samples
好了,本文就先说到这里,有问题欢迎留言讨论。


