松哥给最近连载的 Spring Security 系列也录制了视频教程,感兴趣的小伙伴请戳这里->Spring Boot+Vue+微人事视频教程 (Spring Boot 第十章就是 Spring Security)。
上周把话撂出来,看起来小伙伴们都挺期待的,其实松哥也迫不及待想要开启一个全新的系列。
但是目前的 Spring Security 系列还在连载中,还没写完。连载这事,一鼓作气,再而衰三而竭,一定要一次搞定,Spring Security 如果这次放下来,以后就很难再拾起来了。
所以目前的更新还是 Spring Security 为主,同时 Spring 源码解读每周至少更新一篇 ,等 Spring Security 系列更新完毕后,就开足马力更新 Spring 源码。其实 Spring Security 中也有很多和 Spring 相通的地方,Spring Security 大家文章认真看,松哥不会让大家失望的!
1.从何说起 Spring 要从何说起呢?这个问题我考虑了很长时间。
因为 Spring 源码太繁杂了,一定要选择一个合适的切入点,否则一上来就把各位小伙伴整懵了,那剩下的文章估计就不想看了。
想了很久之后,我决定就先从配置文件加载讲起,在逐步展开,配置文件加载也是我们在使用 Spring 时遇到的第一个问题,今天就先来说说这个话题。
2.简单的案例 先来一个简单的案例,大家感受一下,然后我们顺着案例讲起。
首先我们创建一个普通的 Maven 项目,引入 spring-beans 依赖:
1 2 3 4 5 <dependency > <groupId > org.springframework</groupId > <artifactId > spring-beans</artifactId > <version > 5.2.6.RELEASE</version > </dependency >
然后我们创建一个实体类,再添加一个简单的配置文件:
1
2
3
4
5
public class User { private String username; private String address; }
resources 目录下创建配置文件:
1
2
3
4
5
6
7
<?xml version="1.0" encoding="UTF-8" ?> <beans xmlns ="http://www.springframework.org/schema/beans" xmlns:xsi ="http://www.w3.org/2001/XMLSchema-instance" xsi:schemaLocation ="http://www.springframework.org/schema/beans http://www.springframework.org/schema/beans/spring-beans.xsd" > <bean class ="org.javaboy.loadxml.User" id ="user" /> </beans >
然后去加载这个配置文件:
1
2
3
4
5
public static void main (String[] args) { XmlBeanFactory factory = new XmlBeanFactory (new ClassPathResource ("beans.xml" )); User user = factory.getBean(User.class); System.out.println("user = " + user); }
这里为了展示数据的读取过程,我就先用这个已经过期的 XmlBeanFactory 来加载,这并不影响我们阅读源码。
上面这个是一个非常简单的 Spring 入门案例,相信很多小伙伴在第一次接触 Spring 的时候,写出来的可能都是这个 Demo。
在上面这段代码执行过程中,首先要做的事情就是先把 XML 配置文件加载到内存中,再去解析它,再去。。。。。
一步一步来吧,先来看 XML 文件如何被加入到内存中去。
3.文件读取 文件读取在 Spring 中很常见,也算是一个比较基本的功能,而且 Spring 提供的文件加载方式,不仅仅在 Spring 框架中可以使用,我们在项目中有其他文件加载需求也可以使用。
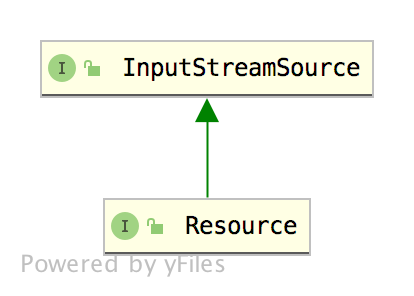
首先,Spring 中使用 Resource 接口来封装底层资源,Resource 接口本身实现自 InputStreamSource 接口:
我们来看下这两个接口的定义:
1
2
3
4
5
6
7
8
9
10
11
12
13
14
15
16
17
18
19
20
21
22
23
24
25
26
27
28
public interface InputStreamSource { InputStream getInputStream () throws IOException; } public interface Resource extends InputStreamSource { boolean exists () ; default boolean isReadable () { return exists(); } default boolean isOpen () { return false ; } default boolean isFile () { return false ; } URL getURL () throws IOException; URI getURI () throws IOException; File getFile () throws IOException; default ReadableByteChannel readableChannel () throws IOException { return Channels.newChannel(getInputStream()); } long contentLength () throws IOException; long lastModified () throws IOException; Resource createRelative (String relativePath) throws IOException; @Nullable String getFilename () ; String getDescription () ; }
代码倒不难,我来稍微解释下:
InputStreamSource 类只提供了一个 getInputStream 方法,该方法返回一个 InputStream,也就是说,InputStreamSource 会将传入的 File 等资源,封装成一个 InputStream 再重新返回。
Resource 接口实现了 InputStreamSource 接口,并且封装了 Spring 内部可能会用到的底层资源,如 File、URL 以及 classpath 等。
exists 方法用来判断资源是否存在。
isReadable 方法用来判断资源是否可读。
isOpen 方法用来判断资源是否打开。
isFile 方法用来判断资源是否是一个文件。
getURL/getURI/getFile/readableChannel 分别表示获取资源对应的 URL/URI/File 以及将资源转为 ReadableByteChannel 通道。
contentLength 表示获取资源的大小。
lastModified 表示获取资源的最后修改时间。
createRelative 表示根据当前资源创建一个相对资源。
getFilename 表示获取文件名。
getDescription 表示在资源出错时,详细打印出出错的文件。
当我们加载不同资源时,对应了 Resource 的不同实现类,来看下 Resource 的继承关系:
可以看到,针对不同类型的数据源,都有各自的实现,我们这里来重点看下 ClassPathResource 的实现方式。
ClassPathResource 源码比较长,我这里挑一些关键部分来和大家分享:
1
2
3
4
5
6
7
8
9
10
11
12
13
14
15
16
17
18
19
20
21
22
23
24
25
26
27
28
29
30
31
32
33
34
35
36
37
38
39
40
41
42
43
44
45
46
47
48
49
50
51
52
53
54
55
56
57
58
59
60
61
62
63
64
65
66
67
68
69
70
71
72
73
74
75
76
77
78
79
80
81
82
83
84
85
86
87
88
89
90
91
92
93
94
95
96
97
98
99
100
101
102
public class ClassPathResource extends AbstractFileResolvingResource { private final String path; @Nullable private ClassLoader classLoader; @Nullable private Class<?> clazz; public ClassPathResource (String path) { this (path, (ClassLoader) null ); } public ClassPathResource (String path, @Nullable ClassLoader classLoader) { Assert.notNull(path, "Path must not be null" ); String pathToUse = StringUtils.cleanPath(path); if (pathToUse.startsWith("/" )) { pathToUse = pathToUse.substring(1 ); } this .path = pathToUse; this .classLoader = (classLoader != null ? classLoader : ClassUtils.getDefaultClassLoader()); } public ClassPathResource (String path, @Nullable Class<?> clazz) { Assert.notNull(path, "Path must not be null" ); this .path = StringUtils.cleanPath(path); this .clazz = clazz; } public final String getPath () { return this .path; } @Nullable public final ClassLoader getClassLoader () { return (this .clazz != null ? this .clazz.getClassLoader() : this .classLoader); } @Override public boolean exists () { return (resolveURL() != null ); } @Nullable protected URL resolveURL () { if (this .clazz != null ) { return this .clazz.getResource(this .path); } else if (this .classLoader != null ) { return this .classLoader.getResource(this .path); } else { return ClassLoader.getSystemResource(this .path); } } @Override public InputStream getInputStream () throws IOException { InputStream is; if (this .clazz != null ) { is = this .clazz.getResourceAsStream(this .path); } else if (this .classLoader != null ) { is = this .classLoader.getResourceAsStream(this .path); } else { is = ClassLoader.getSystemResourceAsStream(this .path); } if (is == null ) { throw new FileNotFoundException (getDescription() + " cannot be opened because it does not exist" ); } return is; } @Override public URL getURL () throws IOException { URL url = resolveURL(); if (url == null ) { throw new FileNotFoundException (getDescription() + " cannot be resolved to URL because it does not exist" ); } return url; } @Override public Resource createRelative (String relativePath) { String pathToUse = StringUtils.applyRelativePath(this .path, relativePath); return (this .clazz != null ? new ClassPathResource (pathToUse, this .clazz) : new ClassPathResource (pathToUse, this .classLoader)); } @Override @Nullable public String getFilename () { return StringUtils.getFilename(this .path); } @Override public String getDescription () { StringBuilder builder = new StringBuilder ("class path resource [" ); String pathToUse = this .path; if (this .clazz != null && !pathToUse.startsWith("/" )) { builder.append(ClassUtils.classPackageAsResourcePath(this .clazz)); builder.append('/' ); } if (pathToUse.startsWith("/" )) { pathToUse = pathToUse.substring(1 ); } builder.append(pathToUse); builder.append(']' ); return builder.toString(); } }
首先,ClassPathResource 的构造方法有四个,一个已经过期的方法我这里没有列出来。另外三个,我们一般调用一个参数的即可,也就是传入文件路径即可,它内部会调用另外一个重载的方法,给 classloader 赋上值(因为在后面要通过 classloader 去读取文件)。
在 ClassPathResource 初始化的过程中,会先调用 StringUtils.cleanPath 方法对传入的路径进行清理,所谓的路径清理,就是处理路径中的相对地址、Windows 系统下的 \\ 变为 / 等。
getPath 方法用来返回文件路径,这是一个相对路径,不包含 classpath。
resolveURL 方法表示返回资源的 URL,返回的时候优先用 Class.getResource 加载,然后才会用 ClassLoader.getResource 加载,关于 Class.getResource 和 ClassLoader.getResource 的区别,又能写一篇文章出来,我这里就大概说下,Class.getResource 最终还是会调用 ClassLoader.getResource,只不过 Class.getResource 会先对路径进行处理。
getInputStream 读取资源,并返回 InputStream 对象。
createRelative 方法是根据当前的资源,再创建一个相对资源。
这是 ClassPathResource,另外一个大家可能会接触到的 FileSystemResource ,小伙伴们可以自行查看其源码,比 ClassPathResource 简单。
如果不是使用 Spring,我们仅仅想自己加载 resources 目录下的资源,也可以采用这种方式:
1
2
ClassPathResource resource = new ClassPathResource ("beans.xml" );InputStream inputStream = resource.getInputStream();
拿到 IO 流之后自行解析即可。
在 Spring 框架,构造出 Resource 对象之后,接下来还会把 Resource 对象转为 EncodedResource,这里会对资源进行编码处理,编码主要体现在 getReader 方法上,在获取 Reader 对象时,如果有编码,则给出编码格式:
1
2
3
4
5
6
7
8
9
10
11
public Reader getReader () throws IOException { if (this .charset != null ) { return new InputStreamReader (this .resource.getInputStream(), this .charset); } else if (this .encoding != null ) { return new InputStreamReader (this .resource.getInputStream(), this .encoding); } else { return new InputStreamReader (this .resource.getInputStream()); } }
所有这一切搞定之后,接下来就是通过 XmlBeanDefinitionReader 去加载 Resource 了。
4.小结 好啦,今天主要和小伙伴们分享一下 Spring 中的资源加载问题,这是容器启动的起点,下篇文章我们来看 XML 文件的解析。
如果小伙伴们觉得有收获,记得点个在看鼓励下松哥哦~


